Introduction
Rotator cuff repair is one of the most common shoulder surgeries, treating tears in the tendons that stabilize and move the shoulder joint. Success depends heavily on following a structured rehabilitation protocol that balances healing protection with gradual mobilization. This guide provides a comprehensive overview of what to expect during your recovery.
Understanding the Rotator Cuff
The rotator cuff consists of four muscles and their tendons:
– Supraspinatus: Initiates arm elevation
– Infraspinatus: External rotation
– Teres Minor: External rotation and stabilization
– Subscapularis: Internal rotation
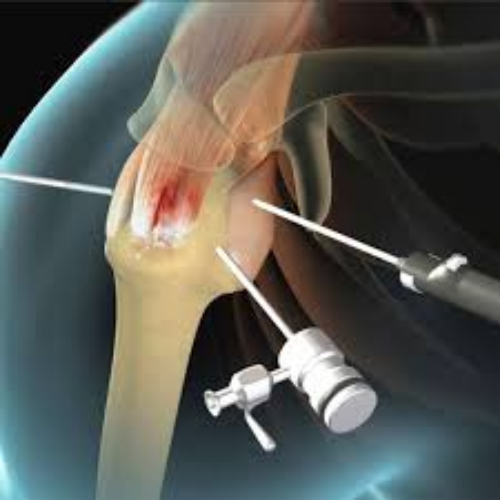
Repair involves reattaching torn tendon(s) to the bone, typically using surgical anchors. The biological healing process takes 3-4 months, which is why rehabilitation must be gradual and carefully controlled.
Factors Affecting Recovery Timeline
Your specific recovery may be faster or slower based on:
– Tear size: Small (<1cm), medium (1-3cm), large (3-5cm), massive (>5cm)
– Number of tendons torn: Single vs multiple
– Chronicity: Acute vs chronic tears
– Tissue quality: Good vs poor/degenerative
– Repair technique: Single row vs double row vs transosseous equivalent
– Surgical approach: Open vs arthroscopic vs mini-open
– Your age and health status
– Smoking status (smokers heal slower)
Always follow your surgeon’s specific protocol as it’s tailored to your repair.
Phase I: Protection Phase (Weeks 0-6)
Immediate Post-Operative (Days 0-3)
Goals:
– Protect the repair
– Minimize pain and swelling
– Prevent shoulder stiffness
– Maintain hand, wrist, elbow mobility
Pain Management:
– Nerve block (may last 12-24 hours)
– Pain medications (opioids, NSAIDs, acetaminophen)
– Ice packs 20 minutes every 2-3 hours
– Keep shoulder elevated on pillows
– Continuous passive motion (CPM) device if prescribed
Immobilization:
– Sling with abduction pillow (varies by surgeon)
– Wear 24/7 including sleeping (first 4-6 weeks)
– Remove only for exercises and bathing
– Some surgeons use simple sling, others use abduction pillow
Sleeping:
– Sleep in recliner or semi-upright with pillows
– Most comfortable position for first 2-4 weeks
– Transition to bed when comfortable
Weeks 1-2: Early Protection
Restrictions:
– NO active shoulder movement
– NO lifting with operative arm
– NO reaching or grabbing
– NO supporting body weight with operative arm
– Keep arm in sling at all times except exercises
Passive Exercises Only (therapist or opposite arm moves it):
Pendulum Exercises:
– Lean forward, let arm hang
– Gently swing arm in small circles
– Forward/backward, side to side
– 5 minutes, 3-4 times daily
– Gravity provides gentle stretch
Passive Forward Elevation (Supine):
– Lie on back
– Use opposite hand to lift operative arm
– Stay below 90 degrees initially
– 10 repetitions, 3 times daily
Passive External Rotation (Supine):
– Lie on back, elbow at side bent 90 degrees
– Use stick or opposite hand
– Rotate arm outward gently
– Stay in pain-free range
– 10 repetitions, 3 times daily
Elbow/Wrist/Hand Exercises:
– Grip strengthening (squeeze ball)
– Wrist flexion and extension
– Elbow bending and straightening
– Perform 10-15 reps, 3-4 times daily
Activities of Daily Living:
– One-handed activities only
– Modified bathing (keep wound dry initially)
– Dress surgical arm first, undress last
– Use button-up shirts, avoid pull-overs
– No driving (typically 4-6 weeks minimum)
Weeks 3-6: Continued Protection with Increasing Motion
Goals:
– Gradually increase passive range of motion
– Protect healing tissue
– Prevent stiffness
– Begin gentle scapular exercises
Continue Immobilization:
– Wear sling at all times except exercises
– May wean during day around week 5-6 if cleared
– Continue at night until week 6
Physical Therapy Begins (typically week 2-4):
– 2-3 times per week
– Focus on passive range of motion
– Manual therapy
– Scar mobilization
– Modalities (ice, electrical stimulation)
Progressive Passive Exercises:
Passive Forward Elevation:
– Progress to 120-140 degrees by week 6
– Use pulley system or therapist assistance
– Perform 10-15 reps, 2-3 sets
Passive External Rotation:
– Progress to 30-45 degrees
– Arm at side, elbow bent 90 degrees
– Use stick or therapist assistance
Passive Internal Rotation:
– Hand behind back progression
– Very gentle initially
– May be restricted if subscapularis repaired
Scapular Exercises (Gentle):
– Scapular retraction (squeeze shoulder blades)
– Scapular depression (pull shoulders down)
– Can begin week 4-6
– No weight, just muscle activation
Range of Motion Goals by Week 6:
– Forward elevation: 120-140 degrees (passive)
– External rotation: 30-45 degrees (passive)
– Internal rotation: To belly button (passive)
What to Avoid:
– No active lifting of arm
– No weight lifting
– No pushing or pulling
– No reaching behind back forcefully
– No sudden movements or catching yourself
Phase II: Active-Assisted Motion (Weeks 7-12)
Weeks 7-9: Beginning Active Motion
Goals:
– Initiate gentle active motion
– Continue improving passive range
– Begin light strengthening
– Wean from sling
Sling:
– Discontinue around week 6-8 as directed
– May feel vulnerable initially – this is normal
– Use for comfort if needed
Active-Assisted Exercises:
Supine Active-Assisted Forward Elevation:
– Lie on back, use opposite arm to help
– Gradually decrease assistance
– 10-15 repetitions, 2-3 sets
Active-Assisted External Rotation:
– Use stick for assistance
– Progress to less assistance
– 10-15 repetitions, 2-3 sets
Active Range of Motion (AROM) Exercises:
Shoulder Shrugs:
– Lift shoulders toward ears
– Hold 5 seconds
– 15 repetitions, 2-3 sets
Scapular Squeezes:
– Pull shoulder blades together
– Hold 5 seconds
– 15-20 repetitions, 2-3 sets
Isometric Exercises (Gentle):
– Internal rotation (push against wall)
– External rotation (push against wall)
– Abduction (push against wall)
– Hold 5 seconds, no pain
– 10 repetitions each direction
Weeks 10-12: Progressive Active Motion
Goals:
– Achieve full passive range of motion
– Progress active range of motion
– Begin light resistance exercises
– Improve scapular control
Active Exercises Progress:
Active Forward Elevation:
– Standing, lift arm forward
– Only to pain-free range initially
– Progress to overhead by week 12
– 10-15 repetitions, 2-3 sets
Active Scaption:
– Lift arm at 45-degree angle from body
– Thumb pointing up
– 10-15 repetitions, 2-3 sets
Active External Rotation:
– Elbow at side, bent 90 degrees
– Rotate arm outward
– 10-15 repetitions, 2-3 sets
Wall Slides:
– Face wall, walk fingers up
– Progress height gradually
– Hold at top 10 seconds
Light Resistance (weeks 11-12):
– Resistance bands (lightest tension)
– 1-2 pound weights
– Focus on control, not strength
– 12-15 repetitions, 2 sets
Range of Motion Goals by Week 12:
– Forward elevation: 140-160 degrees (active)
– External rotation: 45-60 degrees (active)
– Internal rotation: Behind back to belt level
Activities:
– Light activities of daily living
– No lifting >1-2 pounds
– No overhead activities
– No pushing/pulling
– May drive if cleared and off narcotics
Phase III: Early Strengthening (Weeks 13-18)
Weeks 13-15: Initiating Strength Training
Goals:
– Full active range of motion
– Begin progressive strengthening
– Restore rotator cuff strength
– Improve endurance
Resistance Exercises:
Resistance Band Exercises:
External Rotation (standing):
– Band at elbow height
– Elbow at side, bent 90 degrees
– Rotate outward against band
– 12-15 reps, 3 sets
Internal Rotation:
– Band at elbow height
– Rotate inward against band
– 12-15 reps, 3 sets
Shoulder Abduction:
– Stand on band, lift arm to side
– To shoulder height
– 12-15 reps, 3 sets
Forward Elevation:
– Stand on band, lift arm forward
– Progress to overhead
– 12-15 reps, 3 sets
Rows:
– Band secured in front
– Pull band toward chest
– Squeeze shoulder blades
– 12-15 reps, 3 sets
Scapular Strengthening:
Wall Push-Ups (Plus):
– Hands on wall at chest height
– Push-up, then push shoulder blades apart
– 10-15 reps, 2-3 sets
Prone T, Y, I Exercises:
– Lie face down on table
– Lift arms in T, Y, and I positions
– Start without weight
– 10-12 reps each position
Weeks 16-18: Progressive Strengthening
Advance Resistance:
– Progress to medium resistance bands
– Add 3-5 pound weights
– Increase sets to 3-4
– Focus on fatigue, not max weight
Functional Exercises:
Internal/External Rotation at 90 Degrees:
– Arm elevated to shoulder height
– Rotate with band resistance
– 12-15 reps, 3 sets
Shoulder Flexion with Weight:
– 3-5 pounds
– Lift overhead
– Controlled lowering
– 12-15 reps, 3 sets
Lateral Raises:
– 2-5 pounds
– Lift to shoulder height
– 12-15 reps, 3 sets
PNF Patterns:
– Diagonal movement patterns
– With resistance band
– Mimics functional movements
Activities:
– Light household chores
– Light yard work (no heavy lifting)
– Swimming (when cleared, typically 4-6 months)
– Return to desk work
– Golf putting and chipping (if cleared)
Phase IV: Advanced Strengthening (Months 5-6)
Goals:
– Maximize strength and endurance
– Return to functional activities
– Prepare for return to sport/work
Strengthening Program:
– Continue progressive resistance
– Advance to 8-12 pound weights
– Add gym equipment (cables, machines)
– Sport-specific training if applicable
Advanced Exercises
Military Press:
– Start with light weight (5-10 lbs)
– Overhead press
– 10-12 reps, 3 sets
Push-Ups:
– Progress from wall to knees to full
– 10-15 reps, 2-3 sets
Chest Press:
– Start light (10-20 lbs)
– Bench or machine
– 10-12 reps, 3 sets
Lat Pull-Down:
– Light to moderate weight
– 12-15 reps, 3 sets
Plyometric Exercises (if appropriate):
– Light medicine ball tosses
– Wall ball throws
– Progress gradually
Functional Activities:
– Return to most daily activities
– Light recreational activities
– Modified sports activities
– Progressive return to work demands
Return to Full Activity (6-12 Months)
Timeline Varies by Activity:
6 Months:
– Full daily activities
– Swimming
– Golf (full swing)
– Light tennis (groundstrokes)
– Cycling
– Walking, hiking
9-12 Months:
– Return to overhead sports
– Tennis (full play)
– Baseball, softball (pitching/throwing)
– Heavy lifting
– Contact sports (if cleared)
– Manual labor
Criteria for Return to Sport:
– Full pain-free range of motion
– 85-90% strength compared to opposite side
– Normal scapular mechanics
– Sport-specific functional tests passed
– Surgeon clearance
Special Considerations
Large or Massive Tears
– Slower progression (6-8 weeks immobilization)
– More cautious with active motion
– May limit heavy lifting permanently
– Goal may be pain relief vs full strength
Subscapularis Repairs
– More restricted internal rotation initially
– Delayed hand-behind-back activities
– More cautious progression
Failed Previous Repair
– More conservative timeline
– Lower expectations may be appropriate
– Discuss realistic goals with surgeon
Workers’ Compensation Cases
– May require independent evaluation
– Work conditioning programs
– Functional capacity evaluation
– Gradual return to work protocol
Red Flags – Contact Surgeon
Immediate Attention:
– Sudden severe pain
– Feeling of “pop” with sudden weakness
– Inability to move arm (outside early post-op period)
– Signs of infection (fever, redness, drainage, increasing pain)
– Numbness or tingling in hand (nerve issue)
Schedule Appointment:
– Pain not improving over time
– Stiffness not improving with therapy
– Unable to progress with exercises
– Feeling of instability
Keys to Successful Recovery
Compliance with Protocol
– Most important factor in success
– Follow timeline – don’t rush
– Attend all PT appointments
– Do home exercises consistently
Patience
– Healing takes time (3-4 months minimum)
– Full recovery 6-12 months
– Don’t compare to others
– Progress is often non-linear
Communication
– Report concerns to surgeon/therapist
– Ask questions when uncertain
– Request modifications if needed
– Honest about pain levels
Lifestyle Factors
– No smoking: Dramatically affects healing
– Nutrition: Adequate protein for tissue repair
– Sleep: Critical for healing
– Manage other health conditions: Diabetes, etc.
Home Exercise Program
– Consistency is key
– Quality over quantity
– 2-3 times daily initially
– Don’t skip exercises even when feeling better
Ice and Pain Management
– Ice after exercises
– Take pain medication before therapy
– Don’t try to be a hero with pain
– Differentiate soreness from injury pain
Long-Term Outlook
Success Rates:
– Small-medium tears: 90-95% success
– Large tears: 80-85% success
– Massive tears: 60-75% success
Expected Outcomes:
– Significant pain reduction
– Improved function
– Return to most activities
– May have some permanent limitations
Implant Longevity:
– Successful repair should last lifetime
– Retear rate: 10-30% depending on factors
– Risk factors for retear: large tear, poor tissue quality, non-compliance, smoking
Conclusion
Recovery from rotator cuff repair is a gradual process requiring patience and commitment. The structured protocol is designed to protect your healing tissue while progressively restoring motion and strength. Every phase is important – rushing through early phases risks retear, while being too cautious in later phases can lead to stiffness. Work closely with your surgical team, follow the prescribed timeline, and remain dedicated to your rehabilitation. Most patients who follow the protocol achieve excellent pain relief and functional improvement, returning to their desired activities. Your diligence in rehabilitation is the most important factor in achieving the best possible outcome.


